
|
Account Settings: Device Management Views |
The Device Management Views page provides device data management. It allows you to view and edit device information; You can, for example, select which devices are managed (under contract) vs non-managed (competitive asset), fill any missing holes in the data that wasn't returned in the audit results or modify any editable column. You may also select or enter different manufacturer and model names from those that were returned in the audit results, but which don't correctly identify the device, as the case with some print controllers.
To update the devices data you can manually edit the values in the grid, or you can load/import the new values from excel files. Any manual adjustments are made distinguishable in a blue font, and the new values are substituted in other Central modules, such as the names displayed to the end-user in the Meter Validation report.
The audit results extracted directly from the device during an audit may be supplemented with attributes provided by the original equipment manufacturer (OEM), or by processing the audit history data and performing calculations. In addition, these values contain fields that may be edited by the Device Management Views page, such as Description and Location. Manual edits may be applied to to the Calculated or OEM sync information. The values are used and displayed throughout Central, with the Device Field Selection page allowing the Administrator to configure their visibility.
Unconnected devices defined as copiers, MFP's or scanners not plugged into a network or workstation; may be added manually to Central , using the Device Management Views page, for the purpose of tracking the entire fleet. With the associated account included in the Meter Validation, the device meters will be empty and will therefore be flagged as a field which requires attention (red cell), prompting the user to manually enter the latest value(s). The Detailed Device information may be updated to provide a location and description to readily locate and identify the device, i.e. 3rd Floor Copy Room.
Depending on the lease and/or service program offered by the dealer, device(s) may be removed from Customer A's environment and later added to Customer B's environment. Central automatically recognizes this, and assigns the meters to the correct account. Combined meter and service histories may be retrieved for a lifetime analysis of the device, regardless of the environment changes that have occurred.
Here are the steps for selecting a device as managed (under contract), manually editing device information (i.e Manufacturer, Model, Serial Number), and manually adding a device:
Step 1: Go to the List All Accounts page and search for the account you want to modify. Then click on the account name. This will display the accounts main page.

Step 2: Click on the Device Views link located near the audit history. This will display the Device Management Views page.

![]() Alternatively, you can select
Device Information from the Equipment menu, to display the Device Management Views
page.
Alternatively, you can select
Device Information from the Equipment menu, to display the Device Management Views
page.
Step 3: If the dealer account (parent account) you selected contains the sub-account (child account) you want to modify, then select the sub-account from the Account drop-down box and click the Apply button.

![]() By default, all devices for the selected
accounts are displayed, whether managed or not. The information may be quickly
filtered using the Filters, i.e. select both
filter options, click Apply button, and the
resulting rows will include child accounts and only show managed devices.
By default, all devices for the selected
accounts are displayed, whether managed or not. The information may be quickly
filtered using the Filters, i.e. select both
filter options, click Apply button, and the
resulting rows will include child accounts and only show managed devices.
![]() If you want to change the device view,
select a new view from the View drop-down box.
If the view you want is not listed, you can edit an existing device view by clicking
on the Customize View button.
If you want to change the device view,
select a new view from the View drop-down box.
If the view you want is not listed, you can edit an existing device view by clicking
on the Customize View button.
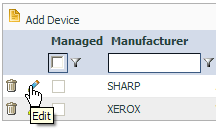
Step 4: Click on the edit link (the graphic symbol is a pencil) for the selected device. This will display the fields that can be edited.

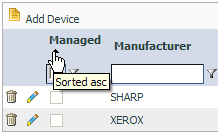
![]() Columns with an up/down arrow below
the header name allow you to click on the header name to sort the data in the grid
either ascending or descending based on the values within that column.
Columns with an up/down arrow below
the header name allow you to click on the header name to sort the data in the grid
either ascending or descending based on the values within that column.

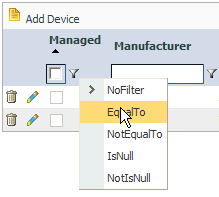
![]() Grid filters provide a robust way to
reduce the amount of data displayed in the grid to those rows with entries that
match criteria you specify. Clicking on the Filter icon displays a list of
the filters, with an option to select no filter. The corresponding keywords
or numbers are entered in the space to the left of the filter icons. For instance,
entering a number into the Devices Non-Managed column will apply the number with
the selected filter option to all values within the Devices Non-Managed column.
Grid filters provide a robust way to
reduce the amount of data displayed in the grid to those rows with entries that
match criteria you specify. Clicking on the Filter icon displays a list of
the filters, with an option to select no filter. The corresponding keywords
or numbers are entered in the space to the left of the filter icons. For instance,
entering a number into the Devices Non-Managed column will apply the number with
the selected filter option to all values within the Devices Non-Managed column.

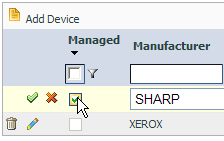
Step 5: Click on the Managed check box so that a green check mark is displayed in the box indicating that it is a managed device (under contract).

![]() If an ERP sync has been set up, by
default the device will be auto-selected as Managed
based on an exact match with either the Serial Number or an ERP Equip ID (if you've
already entered one).
If an ERP sync has been set up, by
default the device will be auto-selected as Managed
based on an exact match with either the Serial Number or an ERP Equip ID (if you've
already entered one).
Step 6: Make any necessary changes (fields missing data or contain wrong information) to any of the device information fields such as Manufacturer, Model Name, Serial Number, and ERP EquipID.

![]() The manufacturer and model values are
extracted real-time from the centrally hosted SideBySide database, or you may enter
your own. You may also enter different manufacturer and model names from those
that were returned in the audit results, but which don't correctly identify the
device, as the case with some print controllers. Any manual adjustments are
made distinguishable in a blue font, and the new values are substituted in other
Central modules.
The manufacturer and model values are
extracted real-time from the centrally hosted SideBySide database, or you may enter
your own. You may also enter different manufacturer and model names from those
that were returned in the audit results, but which don't correctly identify the
device, as the case with some print controllers. Any manual adjustments are
made distinguishable in a blue font, and the new values are substituted in other
Central modules.
![]() Entering the Serial Number allows you
to uniquely identify this device from other similar models in the fleet. Any
manual adjustments are made distinguishable in a blue font, and the new values are
substituted in other Central modules.
Entering the Serial Number allows you
to uniquely identify this device from other similar models in the fleet. Any
manual adjustments are made distinguishable in a blue font, and the new values are
substituted in other Central modules.
![]() If the associated account has been
sync'd with and ERP system, and the Serial Number was an exact match, the ERP Equip
ID field will be populated. If the Serial Number wasn't populated in Central,
or it was not an exact match, the orphan ERP Equip ID values associated with the
account are displayed in a drop-down list for selection, or you may enter your own.
Any manual adjustments are made distinguishable in a blue font, and the new values
are substituted in other Central modules.
If the associated account has been
sync'd with and ERP system, and the Serial Number was an exact match, the ERP Equip
ID field will be populated. If the Serial Number wasn't populated in Central,
or it was not an exact match, the orphan ERP Equip ID values associated with the
account are displayed in a drop-down list for selection, or you may enter your own.
Any manual adjustments are made distinguishable in a blue font, and the new values
are substituted in other Central modules.
Step 7: Once all modifications to a device have been completed, click on the green check mark (not in a check box), to the far left of the device information, to save the settings for that device. Repeat steps 5 through 7 for every device you want to modify.

Step 8: If you need to add a device manually (i.e unconnected copier, printer, or MFP), click on the Add Device link located on the upper left corner above the device information fields. Then fill in the fields with the information you collected from the device manually.

The Device Management Views page provides also the following functionalities:
Customize View Button : to select the device fields you want to be shown in the grid.
Transpose/Import Values Button : links you to the Transpose Device Values page that is used to either copy or import values from one source (a device field, an excel file, etc) to a destination device field(s).
Mark All Managed Button : to set all the devices in the grid as being managed (under contract).
Mark All Un-managed Button : to set all the devices in the grid as being non-managed (competitive asset).
Mark As Managed Button : to set all the devices from an excel file as being managed/non-managed.

Edit Device Fields Button : to update devices fields like ("Manufacturer", "Model", "SerialNr", "ERPEquipID", "Location", "PrinterAssetNr") from an excel file. You also have the option to export data to an excel file.

![]() Manufacturer, Model and SerialNr fields, can't be null or empty!
Manufacturer, Model and SerialNr fields, can't be null or empty!
Export to Excel Button : exports all the data to an excel file.
Blacklist Selected Button : will blacklist all the selected devices. All these devices will no longer be tracked in Central. Any information (Usage or Alerts) will not be stored any more; additionally any previously collected data will be purged. After this operation, it will be provided an informal message and a link to Device Black Lists page, where all blacklisted devices will be shown.
To select a device, you have to check the check box from the first column. The grid let you also have multiple selections. The top left corner check box allows you to select all the devices from the current grid page.

Reasons for Missing Coverage
- Reasons are shown when coverage is not present on a device, for any color;
- Reasons are shown only if the Historical
Supplies Coverage Calculation is enabled
in the Server Configuration
page, Functionality section;
- Reasons are calculated only for markers: Toner, Ink, Wax;
- Supported coverage colors: Black,
Cyan,
Magenta and
Yellow;
- Reasons may be only one of the following values, in below order:
1. No supplies reported: No supplies information is reported by
the device from the MIB;
2. No supply levels reported: Supplies levels reported are all
Normalized (usually same value);
3. Not enough device info: Not enough information is provided
by the device to map to SBS parts information;
4. Not enough supply history: At least 2 entries and a 5%
supply level change are required for coverage calculations;
5. No matching supplies: Supply parts information is not in
SBS;
6. No yield information: The Yield part information is not in
SBS;
6. Invalid page counters: No meter reads are associated to the
supplies changes. The search window used is of 25% from the supply lifetime,
with a max of 7 days before and after the change occurred.
|
Copyright © 2011 FMAudit, LLC. All Rights Reserved. |